Subject CRFs
Subject CRFs are the case report forms a site fills in for a subject at each timepoint — screening data, demographics, stroke scales, and so on. They carry no imaging, so they can be completed before, after, or entirely independently of any upload.
They are a different thing from the two other kinds of form in the platform:
| Filled in by | Attached to | |
|---|---|---|
| Reader report | Readers and Admins, e-signed | An upload |
| Subject report | Sites and Admins | The subject as a whole (one form per study) |
| Subject CRF | Sites and Admins | The subject at a timepoint (many forms) |
Before you start
- Your role. Study Admins can fill in CRFs for any subject. Uploaders (and upload-view users) can fill them in only for subjects at their own sites. Everyone else sees the forms read-only, with no save button.
- The subject exists. CRFs belong to a subject, so create the subject first — see Subjects and Records.
- The study has CRFs configured. If the CRFs tab says No subject forms configured, ask a study admin to set them up (see Setting up the instruments).
Filling out a CRF, step by step
1. Open the subject's CRFs tab
Go to Data → Subjects, open the subject, and choose the CRFs tab.
The tab shows a grid: each collection instrument is a row, and each of the study's timepoints is a column. Every cell is one form to fill in.
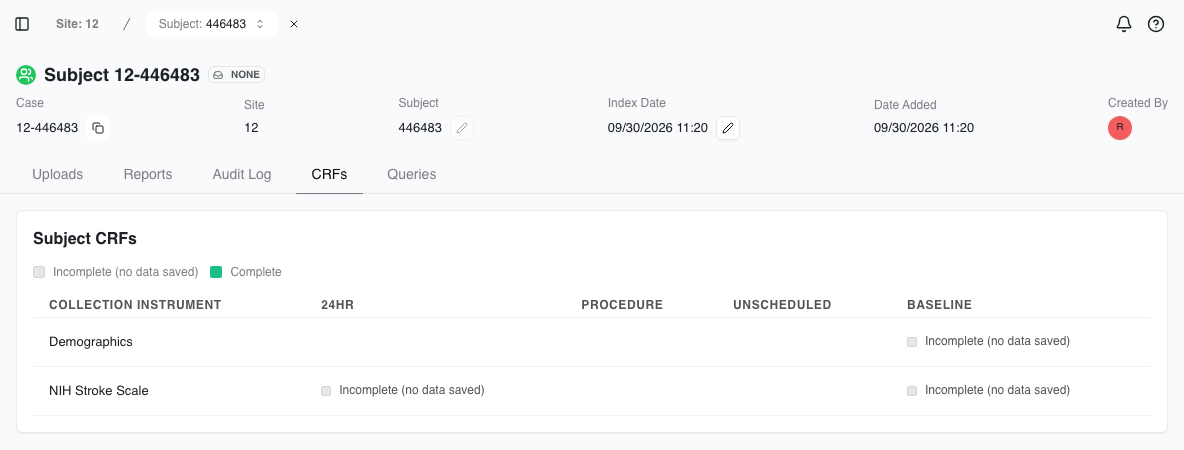
A blank cell is not an oversight. It means that instrument is not collected at that timepoint. In the example above, Demographics is collected only at Baseline, and nothing is collected at Procedure or Unscheduled.
| Cell | Meaning |
|---|---|
| Incomplete (no data saved) | Nothing has been entered for this cell yet. |
| Complete | The form has been filled in and saved. |
Hover over a cell to see which instrument and timepoint it is, for example NIH Stroke Scale at Baseline: Incomplete (no data saved).
2. Click the cell for the instrument and timepoint
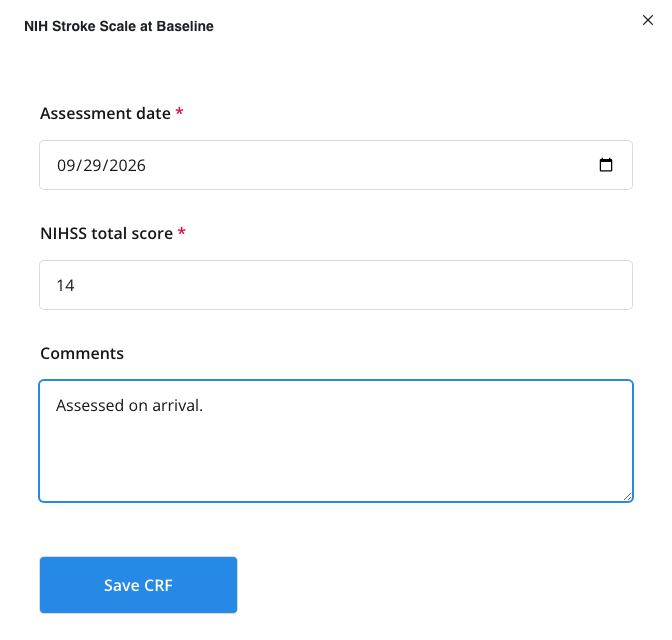
The form opens in a drawer titled with the instrument and the timepoint. Check the title before you enter anything, so the data goes against the right visit.
3. Fill in the form
Questions marked with a red * are required.
4. Click Save CRF
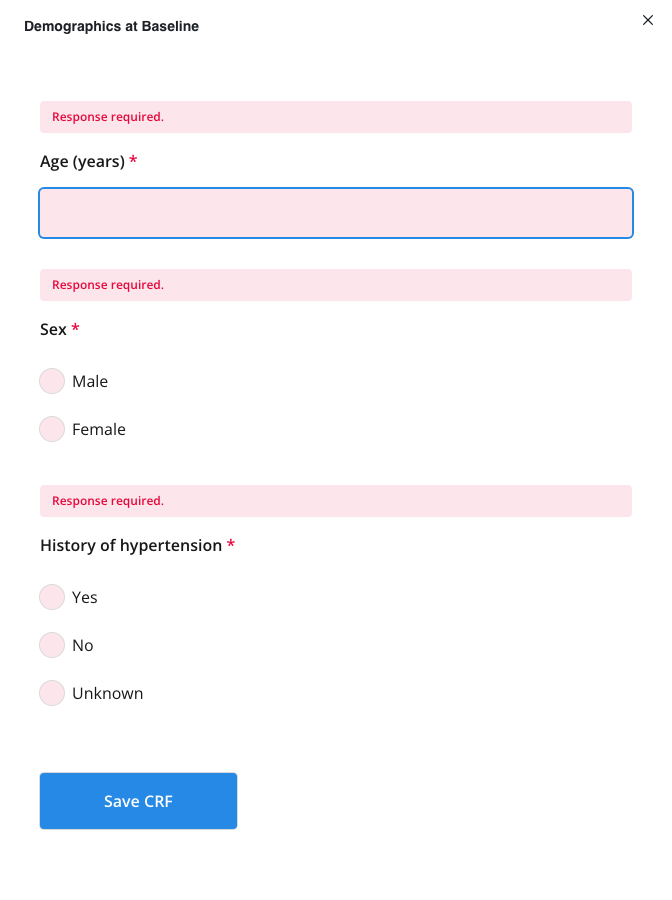
If a required question is empty, nothing is saved. The drawer marks each missing answer with Response required. so you can fill it in and save again.
When the save succeeds you see CRF saved, and the cell turns Complete. Close the drawer to return to the grid.
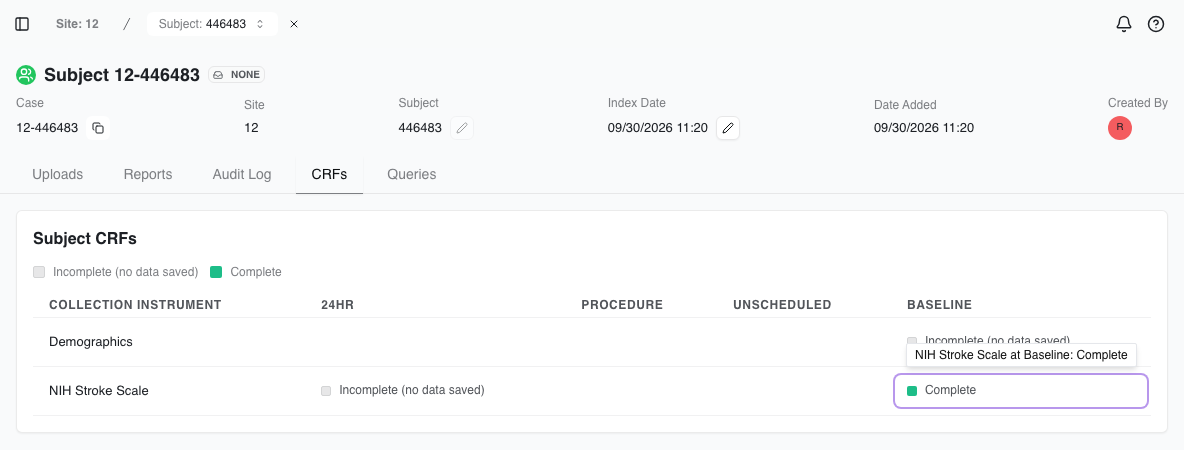
Saving a CRF completes its cell. The grid answers "has this been filled in", not "is every optional question answered". No passkey or e-signature is needed, unlike a reader report.
Correcting a CRF
Click a Complete cell to reopen the form with the saved answers. Change what you need and click Save CRF again. This updates that cell's record rather than creating a second one, and the change is recorded in the audit trail.
Always enter and correct CRFs from the CRFs tab. The Reports tab lists CRFs so you can review them, but it is not where you edit them.
Answers that fill themselves in
Some questions are set up to copy an answer from somewhere else, such as a value on the subject record or an answer on another of the subject's forms. When you open the form, an empty question like this is prefilled, and its description says where the value came from, for example from Subject, or the source form's name and date.
- A prefilled answer is an ordinary answer. Check it, change it if it is wrong, and it is saved only when you click Save CRF.
- An answer you have already saved is never overwritten when the form is opened.
- To pull the value again after the source changes, click the ↻ button next to the question (tooltip: Refresh from the source form).
Series date and time questions
A form may ask for the date and time of an imaging series. On a CRF there is no viewer to read it from, so the question shows No viewer connected — enter the date and time manually. Enter the Series description, Series date and Series time by hand. If the question takes several series, use + Add row for each one.
The subject report row
If the study has a subject report, it is the first row of the grid. It belongs to the subject as a whole rather than to a visit, so its one cell spans all the timepoint columns.
It works slightly differently from the other rows. Clicking it opens the subject report. Click Edit, make your changes, and click Save (or Cancel to discard them). You will see Subject report updated when it has saved.
Answering a query on a CRF
A data manager or monitor may raise a query against one of a subject's CRFs, for example when a value looks wrong or a form is missing. Open queries show as a badge on the subject's Queries tab. To answer one:
- Open the query from the subject's Queries tab and read what is being asked.
- If a value needs correcting, go to the CRFs tab, open the cell, correct it, and click Save CRF.
- Go back to the query, click Reply instead, and write a reply that says what you changed, or why the value is correct as entered. Then click Reply.
- The person who raised the query reviews your reply and resolves it, or reopens it if more is needed.
For a CRF, correcting the value does not answer the query by itself, so always reply as well. The query's Report tab cannot show a CRF (it reads This query's upload isn't recorded, so its form can't be loaded.), so make your correction on the CRFs tab as described above.
Audit trail
Every save is recorded in the subject's Audit Log tab and in the study audit log. Each entry shows the user, the timestamp, and a field-by-field record of what changed. See Audit Logs.
Seeing and exporting CRF data
Saved CRFs appear as report rows wherever reports are listed. Use the grid to enter data, and the report views to review it in bulk:
- A subject's Reports tab lists its CRFs alongside that subject's reader reports. Use the Subject CRFs filter to show only CRFs.
- Data → Reports has a Subject CRFs chip next to Reader Output, Adjudication and QC.
- Export Data offers Subject CRFs as a report type. Every transform works, and the Tidy transform puts each answer in its own column, with one row per instrument and timepoint. See Exporting Data.
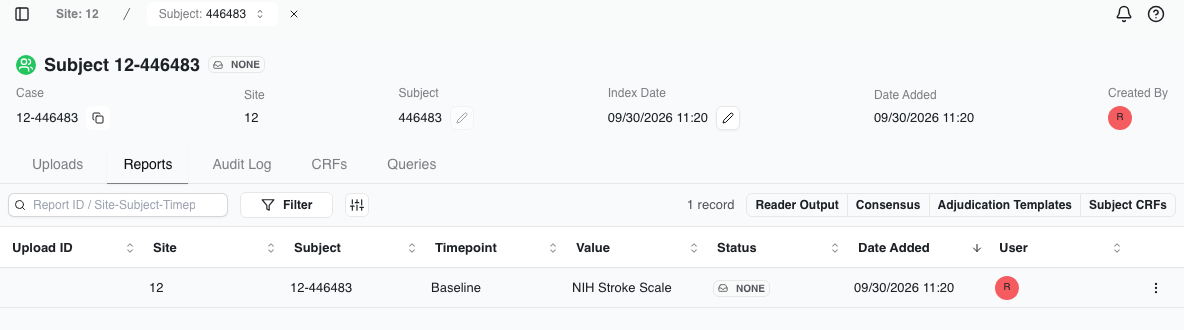
A CRF row has no Upload ID, because there is no imaging behind it.
Setting up the instruments (Admins)
Where: Management → Forms
- Click Create Form.
- On the New form page:
- Name: what sites will see, for example NIH Stroke Scale.
- Type: choose Subject CRF (The site completes it for a subject at a timepoint.).
- Timepoints: the timepoints this instrument is collected at.
- Click Continue to the designer, add the questions, and click Save Survey.
- Every form save asks What changed and why. Add a short note and confirm. The form appears in the left-hand list under SUBJECT CRF.
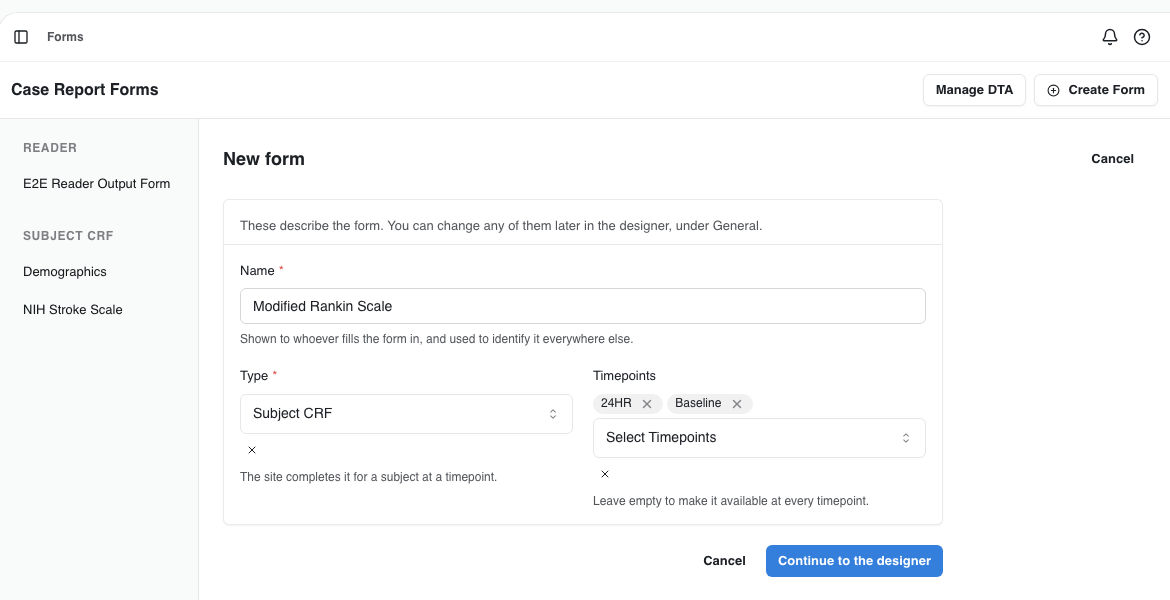
Name, type and timepoints can all be changed later in the designer, under General.
Rules for instruments
- One form, many timepoints. An instrument collected at several visits is one form that lists all of them. For example, "NIH Stroke Scale" with timepoints Baseline and 24HR is a single row with two cells. Do not create one form per timepoint: four separate forms give you four rows with one cell each. (Reader reports are often built one per visit because their content genuinely differs per visit. Subject CRFs usually do not.)
- Timepoints decide the cells. Every timepoint you do not list is left blank in the grid. Leaving timepoints empty means the instrument is collected at every timepoint.
- The study's timepoints come first. Configure them in Management → Timepoints. A subject CRF is collected per timepoint, so with no timepoints the grid has no columns.
- New forms are drafts until promoted. A new or changed form is a draft until the study config is promoted to production, so sites in production will not see it before then.
Visits that collect no imaging
Some visits exist only to collect forms, such as a screening questionnaire or a phone follow-up. Mark those in Management → Timepoints with Forms Only (no imaging).
A forms-only timepoint:
- still appears as a column in the subject CRF grid, and can be chosen on a form's timepoints
- is hidden from the timepoint picker when submitting imaging, and when changing an existing upload's timepoint
- is refused by the upload API, so the desktop app and API clients cannot file imaging against it either
- is left out of upload reconciliation and of the study homepage's timepoint panel, instead of sitting there permanently reading "No Uploads"
Accepted modalities are hidden for these timepoints, since no imaging is expected. The setting is off by default, so every existing timepoint continues to accept imaging.
Related
- Subjects and Records: creating subjects and the subject report
- Reporting and Actions: reader reports and e-signatures
- Roles and Permissions: the full action matrix
- Audit Logs: reviewing what changed