Uploading Imaging
This guide walks through the full imaging upload workflow — from preparing a subject to opening the processed study in the viewer.
Who can upload
Uploading requires the Uploader role (or Admin) on the target study. Readers can view processed uploads but cannot submit new imaging.
If you do not see New Upload on the Uploads screen, ask a study admin to confirm your role assignment.
Before you upload
Confirm these prerequisites are in place:
- Subject exists — every upload is tied to a site and subject. If the subject is not in the system yet, an admin must create it first (see Subjects and Records).
- Timepoints configured — the study must have at least one timepoint with accepted modalities. Admins configure these under Management → Timepoints.
- Source files are ready — DICOM data should be fully copied into a
.ziparchive before you attach it. Do not upload while files are still being written or copied. - Subject ID matches study setup — use the exact subject identifier assigned for that site.
File requirements
| Requirement | Detail |
|---|---|
| Format | A single .zip archive containing DICOM files |
| One timepoint per submission | Submit one timepoint at a time — do not mix timepoints in a single upload |
| Client-side scan | After attaching the file, the portal scans the zip. Wait for Scanning file… to finish before submitting |
| Size warning | Archives under 1 MB trigger a warning — confirm DICOM files are actually inside |
The upload drawer only accepts .zip files. Other formats are rejected during the client-side scan.
Step-by-step upload
1. Open the Uploads list
From the study portal, go to Data → Uploads. The uploads table shows existing submissions with site, subject, timepoint, status, and upload ID.
Click New Upload to open the upload drawer (Upload Details).
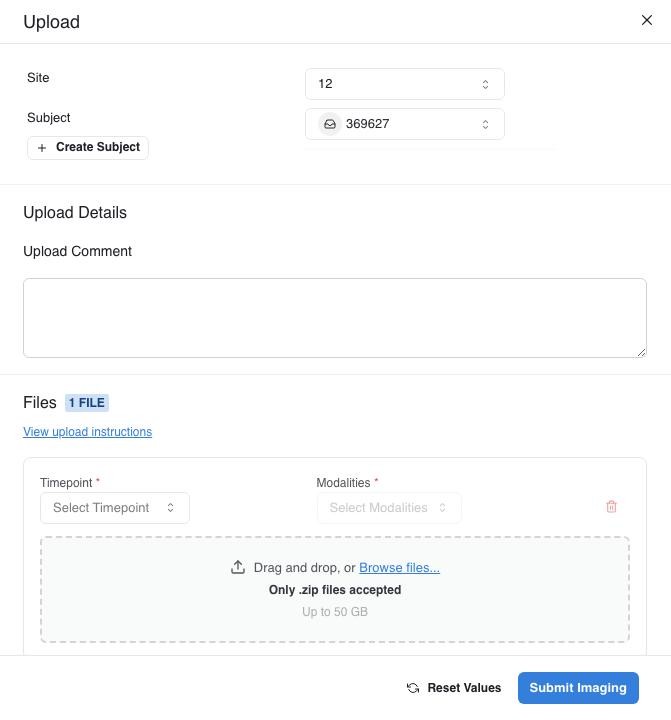
2. Select site and subject
- Choose Site from the dropdown.
- Choose Subject — the subject dropdown becomes available after a site is selected.
- If the subject does not appear, create it first (admin) or confirm you selected the correct site.
You can also create a subject inline from the subject selector when you have permission.
3. Attach the DICOM zip
- Click the file input or drag the
.ziponto the upload area. - Wait for the client-side scan to complete. The UI shows Scanning file… while the archive is inspected.
- Resolve any blocking errors (for example, "File must be a .zip archive" or "Scan found issues") before continuing.
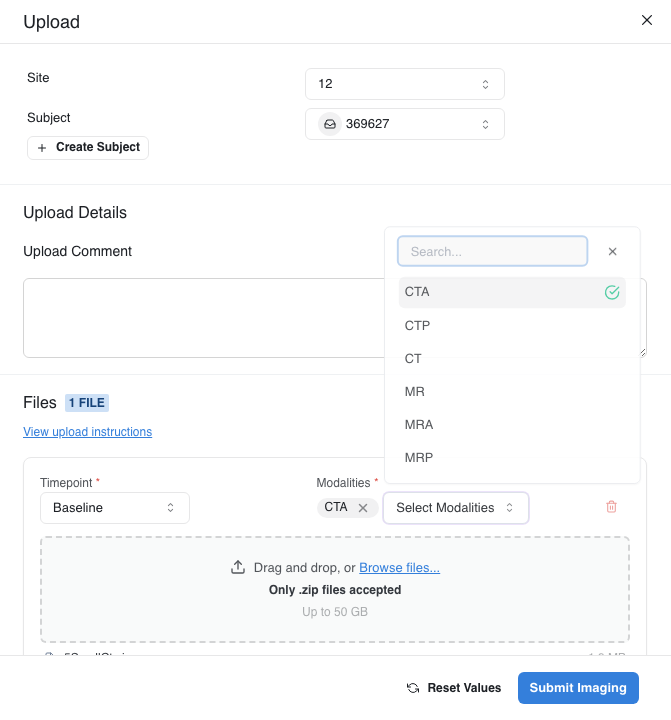
4. Select timepoint and modality
For each attached file:
- Choose Timepoint — options come from the study's configured timepoints. Timepoints marked Forms Only are not listed, since they collect no imaging; see Subject CRFs.
- Choose Modalities — only modalities accepted for that timepoint are listed.
Both fields are required before submission.
5. Submit imaging
Click Submit Imaging. While the upload is in progress:
- A progress indicator shows transfer status.
- Do not close the tab or navigate away — the browser warns you if you try to leave mid-upload.
- The upload drawer cannot be dismissed until the transfer finishes.
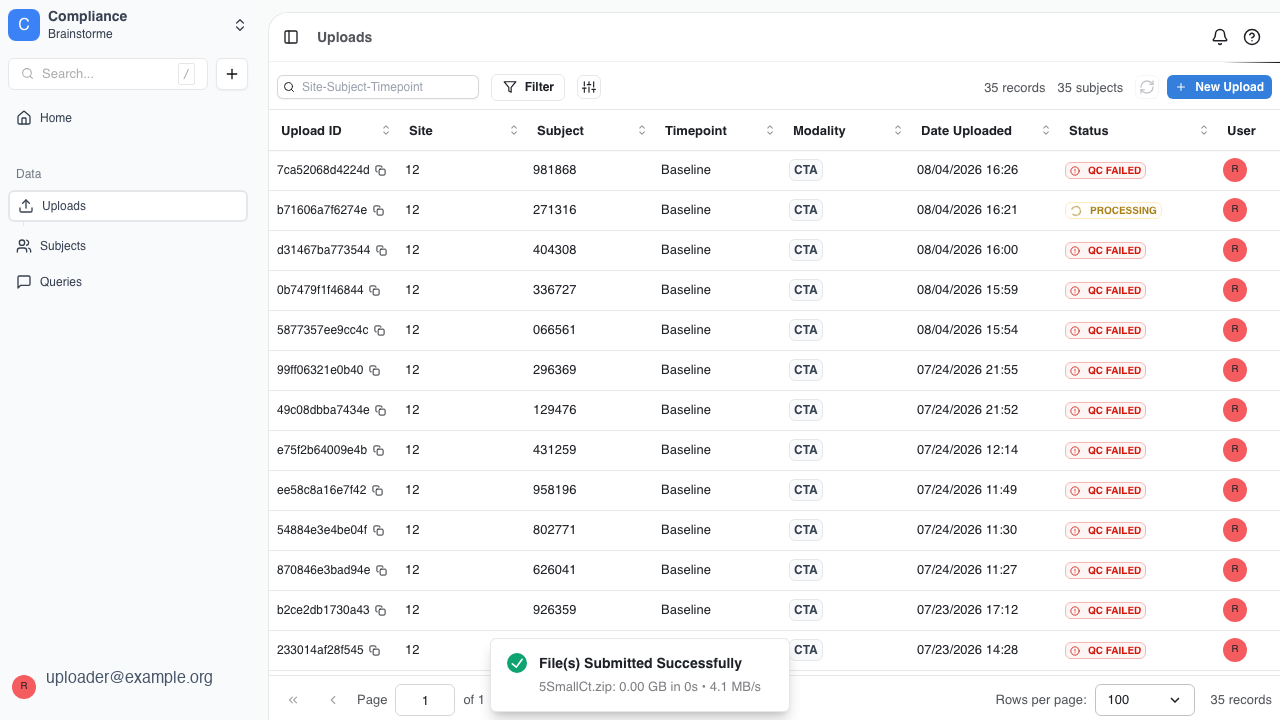
On success, a confirmation message appears: File(s) Submitted Successfully.
You may also receive an upload confirmation email with your upload ID, date uploaded, and initial status. Save this email as proof of receipt.
6. Track status in the uploads table
After submission, the new row appears in the uploads list. Click Refresh to update status badges.
| Status | Meaning |
|---|---|
| PROCESSING | Files accepted; the platform is organizing, validating, and preparing imaging for the viewer |
| READY FOR REVIEW (or similar ready state) | Processing finished — the upload can be opened in the viewer |
| UPLOAD FAILED / FAILED | The pipeline could not process the upload — see Troubleshooting |
| QC outcomes | Some statuses reflect quality-control results rather than a hard failure — check study-specific guidance |
Processing typically takes a few minutes but can take longer for large datasets. Refresh periodically until the status leaves PROCESSING.
7. Open the viewer
When processing completes:
- Click the Upload ID in the uploads table row.
- The imaging viewer opens in a new browser tab.
- Confirm expected series load before starting review.
See Reading and Review for viewer navigation and report completion.
Upload comments (legacy screen)
Users with the Uploader role can also reach Data → Upload (the standalone upload comment screen). This is separate from the Uploads list → New Upload flow above but confirms uploaders retain upload access even when report features are restricted.
Tips
- Prefer consistent naming and complete series for faster review.
- Submit one timepoint per zip to avoid validation issues.
- Copy the upload ID from the table ( Copy upload ID button) when contacting support.
- If Retrigger is available for a failed item, use it before re-uploading everything.
- If an upload keeps failing, click Test my connection on the Upload screen to check whether your network is blocking it.
- After permission or role changes, sign out and back in to refresh your session.