Reading Process
A study's reads are organised by a reader workflow (shown in the portal as a reader pool). The workflow decides who reads, which cases each reader gets, when those cases are handed out, and when a case counts as read.
This page explains how that works and how admins set it up. For opening a case in the viewer and filling in the report, see Reading and Review and Reporting and Actions. When two or more readers read the same case, their answers can be compared and disagreements sent to an adjudicator: see Adjudication.
How a case moves through reading
- An upload matches the workflow's queue conditions, so it enters the workflow's queue.
- If the workflow releases work in batches, the case waits in a batch until that batch is released. If it releases continuously, readers can open it straight away.
- Each reader role (R1, R2, …) reads the case and e-signs a report.
- Once enough roles have submitted, the case is complete. Its status becomes
<workflow ID>_COMPLETE(for exampleprimary_read_COMPLETE) and it leaves the queue.
Reader roles
Every reader workflow has one or more roles, named R1, R2, and so on. Each role is a slot on every case, and each slot is filled by one reader's report. Assigning a person to a role means their reports fill that slot.
- Minimum Required Readers sets how many roles must submit before a case is complete. With roles R1 and R2 and a minimum of 2, both readers must read every case. With a minimum of 1, whichever reader gets there first completes it.
- Auto-apply Non-defined Roles lets someone who isn't assigned to a role read anyway. Their report fills the next open role on the case.
- A role can be left without a person (Skip user assignment for this role) and filled later with Edit readers.
Giving one role its own queue
By default every role sees the same queue. Tick Narrow this role's queue on a role to add conditions that only that role uses. They are combined with the workflow's queue conditions, so an upload reaches that role only when it matches both.
On an upload the role's filter excludes, that role's slot is marked not applicable. A not-applicable slot never blocks completion: the case needs the minimum number of readers, or every applicable role if fewer roles apply.
What puts a case in the queue
Queue Conditions are rules on an upload's Status and Timepoint, using is, is not, is one of and is not one of. The default is Status is READY FOR REVIEW, the status an upload gets once processing has finished.
If your study only reads after another step has signed the upload off, for example a quality or monitoring check that sets its own status, make that status the condition so cases are not read early.
Once a reader has submitted a case, it drops out of their own queue even if other roles still have to read it.
Setting up a reader workflow (admins)
Go to Settings → Workflows, click Create Workflow, and keep Workflow Type set to Reader pool.
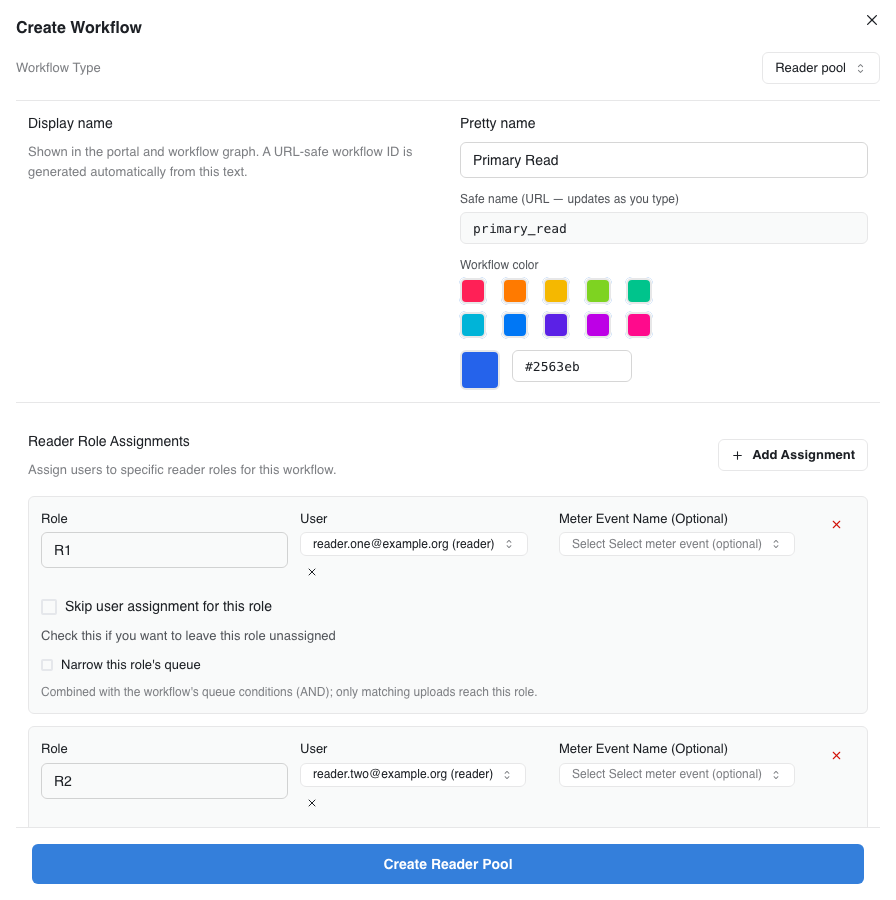
- Display name. Enter a Pretty name. The workflow ID (for example
primary_read) is generated from it and appears in statuses and exports. - Reader Role Assignments. Add one row per role. Click Add Assignment for each extra role, enter the role name (R1, R2, …) and pick the User. Only users who have accepted their study invitation can be picked.
- Minimum Required Readers and Auto-apply Non-defined Roles (see Reader roles).
- Reader release. Choose Continuous or Batched (see Release modes).
- Reports. Pick the form or forms readers complete.
- Queue Conditions. Set when uploads enter the queue.
- Adjudication. Leave Create an adjudication workflow ticked to send disagreements to an adjudicator, or untick it. See Adjudication.
- Click Create Reader Pool.
The new workflow appears under Uploads in the sidebar, with the number of cases in its queue.
Release modes
Continuous
Cases are available to readers the moment they enter the queue. There are no batches.
Batched
Cases collect in a batch and go out to readers together when a trigger is reached. Choosing Batched turns on admin approval, a deadline, reminders and notifications by default. You can change each of them.
| Setting | What it does |
|---|---|
| Release after N cases | Release once this many cases are waiting. |
| Or after N seconds | Release once this much time has passed. You need at least one of these two triggers. |
| Max cases per release | The most cases one batch may hold. Anything over the cap waits for the next batch. It can't be lower than the case threshold. |
| Require a complete set before release | A subject's cases wait until the subject has an upload, not archived, for every timepoint the study marks as required. Use it when a read only makes sense with the full series, for example baseline plus follow-up. |
| Send notifications for this workflow | Turns every batch email for this workflow on or off: released, waiting for approval, completed, reminders and past due. Suppressed sends are still written to the batch's notification log. |
| Require admin approval before release | A batch that reaches its trigger waits as Pending approval until an admin releases it. Readers see nothing until then. |
| Enable deadline from batch release / Days until due | Gives each released batch a due date, 14 days by default. Readers are reminded 3 days before, 1 day before, and on the due date. |
| Weekly notice after due date | Keeps reminding readers once a week while cases in an overdue batch are still unread. |
To change these later, open the workflow's details and click Edit release.
Managing batches (admins)
Open the workflow from the sidebar (Uploads → your workflow) and click its name at the top of the page (Workflow: Primary Read). The details panel shows the release settings, the readers and the Batch history.
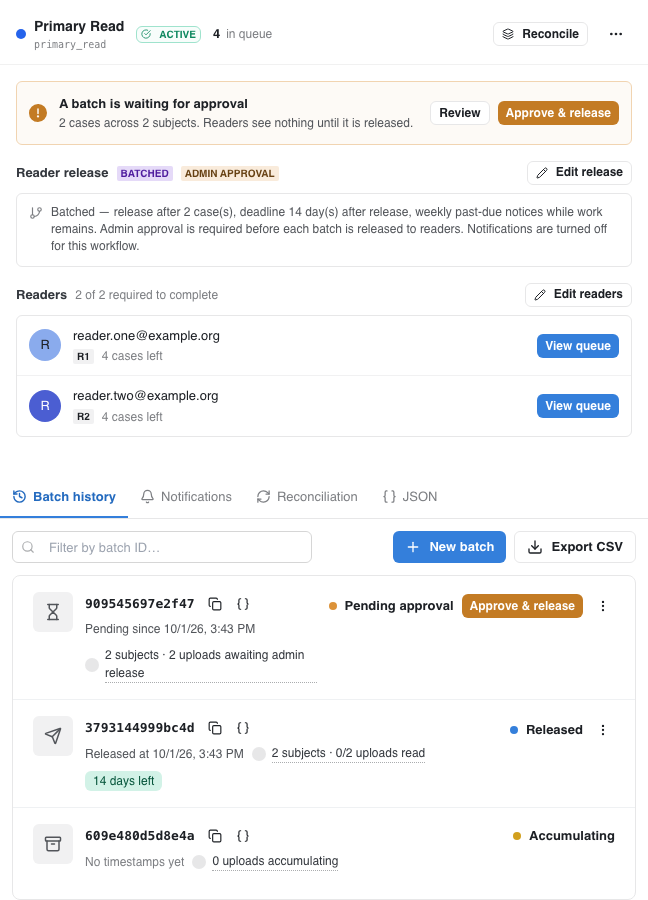
Each batch has a status:
| Status | Meaning |
|---|---|
| Accumulating | Collecting cases. There is only ever one accumulating batch per workflow. |
| Pending approval | Its trigger was reached, but the workflow requires approval. |
| Released | Out with readers. Shows the due date, if there is one. |
| Completed | Every case in it has been read. |
| Cleared | Its cases were returned to the queue. Kept as history. |
If an accumulating batch shows held · incomplete set, some subjects are missing a required timepoint. They join a batch as soon as that upload arrives.
Approving a batch
When a batch is waiting, the panel shows A batch is waiting for approval. Click Approve & release to send it to readers, either in that banner or on the batch's row.
Releasing cases now
You don't have to wait for a trigger:
- Everything that's waiting. In Batch history, click New batch. Everything in the accumulating batch is released straight away, ignoring Max cases per release. Require a complete set before release still applies.
- Cases you pick. In the workflow's uploads list, select the cases and click New Batch. Cases that are already read or already in a batch are left out, and the dialog tells you how many. Picking a case overrides Require a complete set before release for that case.
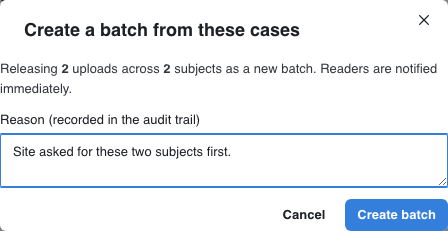
Either way you can enter a reason, which is recorded in the audit trail, and readers are notified immediately. If the workflow requires approval, releasing by hand counts as that approval. Cases you didn't include stay in the queue for the next batch.
Changing a batch after the fact
The ⋮ menu on a released or pending batch has:
- Clear batch (return cases): every case goes back to the queue and is picked up by the next batch.
- Combine into another batch…: moves every case into a batch you choose, then clears this one.
- Force complete (released batches only): closes the batch even though some cases are unread.
Each asks for a reason. You can also move single cases between batches from the uploads list (Move cases to another batch). Export CSV downloads the batch history.
Reader progress
The Readers section of the details panel lists every role, the person in it and how many cases they have left. The heading shows how many readers a case needs (for example 2 of 2 required to complete). View queue opens the workflow's uploads list as that reader sees it.
The uploads list for a batched workflow is split into Released, Accumulating, Pending approval, Completed and All.
The reader's view
Readers find their work under Uploads in the sidebar: one entry per workflow they read for, with the number of cases waiting. Opening it lists their queue.
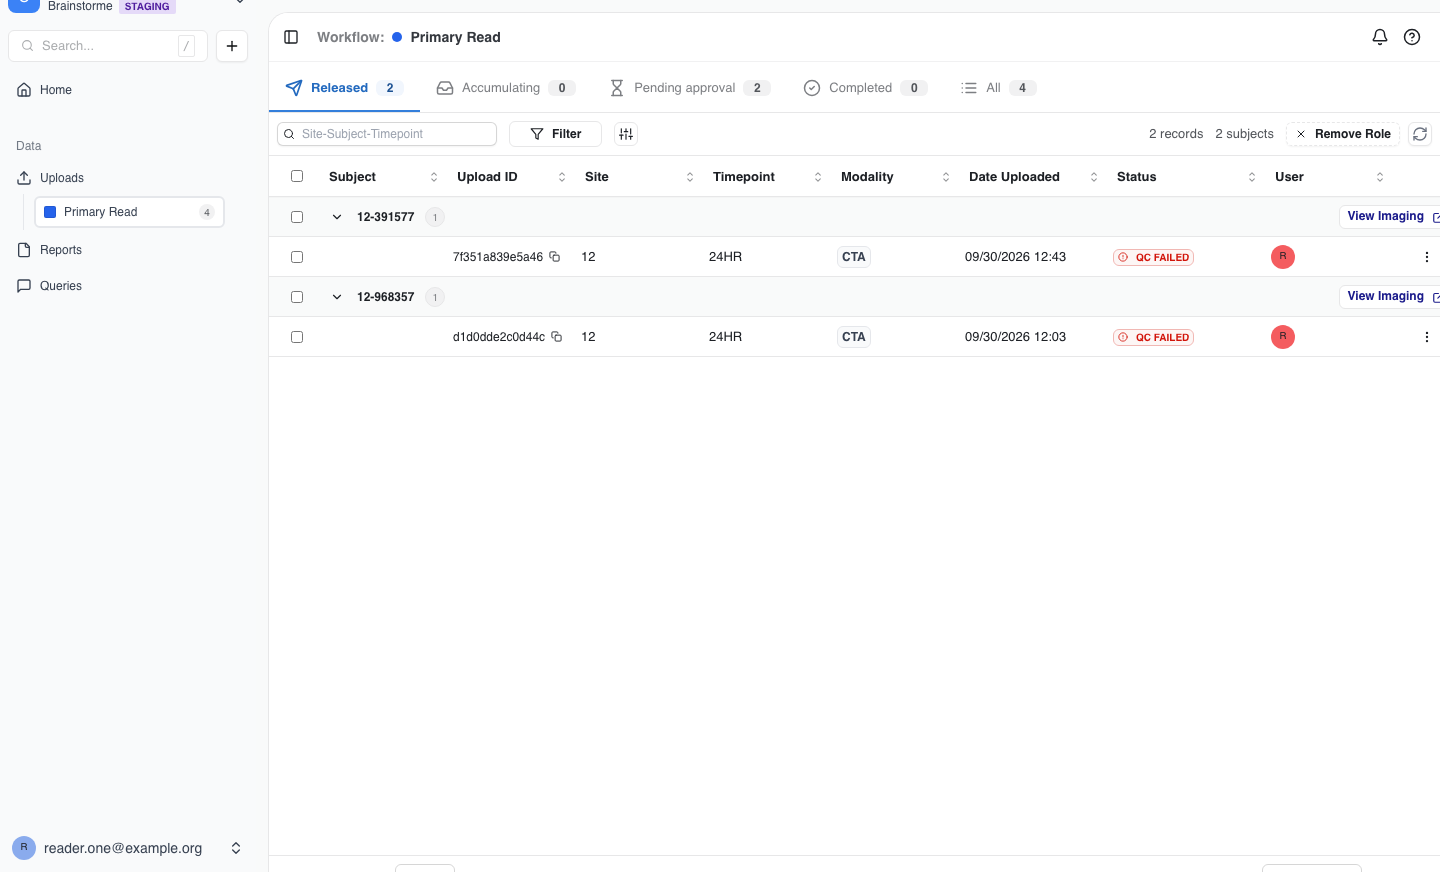
Open a case with View Imaging (or its Upload ID), complete the report in the viewer and e-sign it. The case then drops out of that reader's queue. See Reading and Review.
In a batched workflow, readers only get cases from released batches. When notifications are on, they get an email when a batch is released to them and reminders as its due date approaches.
Test notifications in QA
The QA environment runs the same study setup as production, so QA workflows would otherwise email the real readers, adjudicators and sponsors. Outside production:
- Every email subject starts with the environment, for example [QA], and the email opens with a banner: This is a QA test notification from the Brainstorme QA environment — not a real study action.
- Only allowed addresses receive anything. The
NOTIFICATIONS_MODEsetting isallowlistby default, andNOTIFICATIONS_ALLOWLISTdefaults to@brainstorme.com, so only Brainstorme addresses get QA email. The mode can also beoff(nothing is sent) orall(everyone, still labelled). - A batch email that nobody was allowed to receive shows as Suppressed (non-prod) in the batch's notification log.
To let an external tester receive QA email, ask Brainstorme to add their address to the allowlist. Production email is not affected.